Wednesday, 30 November 2011

Cookies and Cream Bark Tutorial

You Will Need:
*A packet of Oreo's your choice of normal or double stuffed, I went double stuffed!
*White chocolate, I went with milky bar as it was on special but it does melt "yellow" so if you want pure white look use proper melting chocolate from your baking aisle.
*Baking paper
*tray

Cover your tray in baking paper
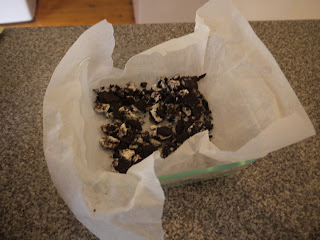
smash up oreos!
Leave some mixture to put on top as decoration (finer crumbs only)
Add larger bits and pieces to tray.


Melt chocolate, I needed to full two blocks of chocolate to cover this size tray.


Spread white chocolate well, I didn't stir I just turned and angled my tray to make the chocolate fill the spaces.
Sprinkle with left over crumbs and refrigerate! 


Once set, use a knife or a fork to break the pieces up into thin long slices of bark! The baking paper will just pull away from the chocolate - easy!

Chocolate Balls Tutorial

You Will Need:
1 Cup Dessicated Coconut PLUS extra for rolling balls in
1 tin of condensed milk
3 tablespoons of cocoa
1 Packet of Milk Coffee or Morning Coffee biscuits
AND the secret ingredient...choc chips!

If you have a tri blade or a blender, whizz the biscuits up until they are crumbs. If not, use the bottom of a glass to push the biscuits into submission!!!


Add all the ingredients. TIP: Do Not use the whole packet of choc chips, it will make rolling your balls impossible! use half or less then!


This is the fun part! TIP: TAKE OFF ANY RINGS!
Using your hands mix the mixture well! It should be a firm but wet consistency.


TIP: DO THIS PART BEFORE GETTING HANDS DIRTY!!
Have a bowl of dessicated coconut and a plate put aside.


Roll mixture into a ball, dip in coconut and place on the plate! Easy, simple! 


I had left over melted chocolate from the smores tutorial so I even dipped some of my balls into the chocolate then the coconut!


Refrigerate then Voila! Enjoy your Chocolate Balls!

Baked Smores Treat Tutorial

You will need:
Chocolate (I love cadbury)
Marshmallows (I used coles as they have a perfect round shape!)
Butternut snap Biscuits (or choc ripple)


Put biscuits into a tray, I have tray that has round bottoms which is perfect but I am sure any cupcake tray would work. 
Put tray into oven, I have a fan forced and put the biscuits in for 5 minutes on 180 degrees.


 Once removed from oven the biscuits are nice and soft its perfect and easy to push the biscuit to form a round shape, you can use a spoon or your fingers, remember be gentle you don't want them to break!


 Score the bottom of the Marshmallows with a knife, you will feel the marshmallow "ease". This will cause the marshmallow to leak stickiness into the biscuit making it stick and form the shape of the biscuit more easily.


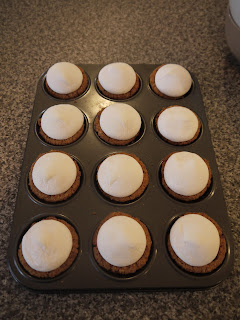
Each biscuit should have a marshmallow, then put in oven. This is a quick process so don't leave the kitchen! Each oven will vary but again I tried to stick to under 5 minutes at 180 degs, you will see your marshmallow flatten out, once that happens its safe to take out!


While your waiting: Melt your chocolate! I zapped half a 350g block in the microwave for 1 min 25 secs and it was perfect! 
TIP: Boil your kettle, put a bit of the boiling water into another heat proof bowl and sit the melted chocolate bowl on top, it keeps the chocolate runny for ages!! REMEMBER don't get any water in your melted chocolate, this will ruin it!


Once you remove from the oven you should have something like this!


Using a spoon, cover your smore in chocolate! Be generous! 


REFRIGERATE IMMEDIATELY! (Leave in the pan) The heat of the chocolate will continue to melt your marshmallow and you'll have a gooey mess so try be fast, don't worry about the mess!
Once set feel free to serve as you wish!

Monday, 28 November 2011

Christmas Whoopie Pies

It's the most wonderful time of the year!
Christmas time is upon us, my favourite time of the year, these designs where Cake Decorating Central's Kit of the Month that I subscribe too.
Whoopie Pies are vanilla flavoured with vanilla cream filling and one with chocolate cream filling.
Stay tuned for my Christmas Cupcakes <3

Sunday, 13 November 2011

18th Birthday Giant Cupcake with cupcakes!

My little sister turned 18! This was her Cake!
Pink and White Giant Cupcake!
 Vanilla Sponge Cake with strawberry and cream filling.
 Bottom is covered in pink fondant, top in white frosting. Decorated with Fondant butterflies and flowers.

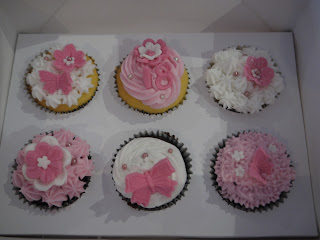
 These are 6 of 50 cupcakes, each frosted slightly differently and decorated with fondant flowers or butterflies and cachous for effect. Cupcakes where flavoured vanilla sponge and chocolate sponge.
My cupcake stand was out on loan but this tray was still very effective!